 10% Off Everything + Free Shipping! [Promo code LOVEMY10]
We get so many questions on how to tune a rope-tension djembe that we decided to dedicate an entire page to this one subject. The below photos and descriptions apply to any rope & ring tuned drum, including the dunun, bugarabu, conga, ngoma, bata, barra, and so forth. For the purpose of simplicity we've chosen to focus on the djembe. The process described is known by many different names, the most common of which are the "Mali Weave", "Pulling Diamonds", and "Turning Knots". We hope you find these instructions helpful. If you have any comments or feedback we'd love to hear from you!
- What does it mean to "tune" a djembe?
- How can I tell if my djembe requires tuning?
- Which tools will I need to tune my djembe?
- Preparing to Tune the Djembe
- Phase One: Pull the Verticals Tight
- Phase Two: The First Row Weave
- Phase Three: The Second Row Weave
- Fine Tuning Tips
WHAT DOES IT MEAN TO "TUNE" A DJEMBE? |
|
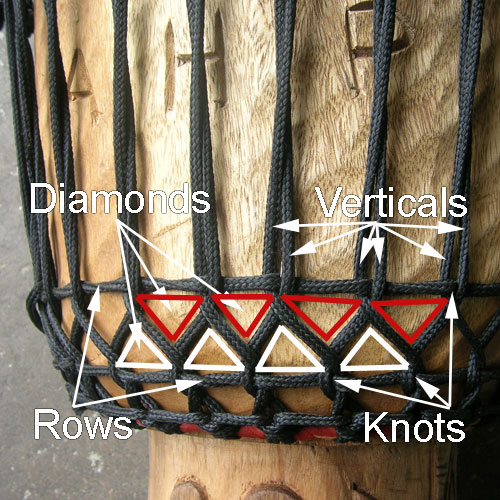
This is a valid question, as often when we speak of "tuning" an instrument we're referring to absolute notes (A, G#, Bb, etc.) or tuning systems (C pentatonic, heptatonic, etc.). With this type of tuning either the instrument is either in tune or out of tune, with no room for error (think of a guitar or piano). However, with most percussion instruments and drums the question of whether or not it is "in tune" is more relative and subjective. In the case of solo instruments (one drum played by one person) the drum should be tuned to itself, such that the optimal sound is produced given its size and material composition. In cases of sets of drums, like congas or dunun, the drums should be tuned to themselves and to each other; individually the drums need to sound good, but as a set they should be pitched relative to the other drums, so that certain intervals in pitch allow the drums to complement one another and create a simple melody when played. One's personal preference for how a drum "should" sound is also a major factor when considering the tuning of a djembe or other drum. A djembe that is in tune is much easier and more efficient to play. Having the proper tension (assuming the quality of the shell and skin are adequate) will allow the drummer to create a variety of distinct sounds by slightly altering the hand and finger position and pressure. The more in-tune, the greater these distinctions will be, and the easier it will be to create them. Playing with speed is also facilitated by having proper tension on the head. A djembe that is out of tune makes sound distinction difficult, and leaves the drummer working extra hard to develop proper technique by trying to make up for deficient tuning or drum quality. The tuning of a djembe or other rope-tension drum is achieved by increasing or decreasing the tension applied to the head by tightening or loosing the ropes or skin. There are a variety of methods one can employ to adjust tension, including heating up the head, hammering the rings down, and most commonly, changing tension in the ropes. To do this there are two broad steps: First is to tighten the vertical ropes (those connecting the top and bottom loops), taking out as much slack as possible; Second is to twist those vertical ropes using a series of woven knots with horizontally-running tuning rope. This weave process creates horizontal rows and a diamond-shape pattern. Proper tuning will generally mean applying the same tension around the circumfrence of a drum, so that there are not tight or loose spots. Read on for details on how to do this! |
|
HOW CAN I TELL IF MY DJEMBE REQUIRES TUNING? |
|
|
The most accurate way to judge whether or not your djembe needs to be tuned is by listening to the sound produced when played with proper technique. Of course, if you don't know what the djembe is supposed to sound like, or if you don't know how to strike the drum to get a good sound, then you'll need to get the input of someone who knows, or you'll have to rely on phisical indicators of proper tension. Keep in mind that low quality djembes may not be capable of producing the range or quality of sound you might expect from a higher quality drum, in which case additional tuning may not help. Indeed, too much tuning, or tightening of the head, can cause it to break. Sound Indicators Even though a djembe may have enough tension, if that tension isn't applied evenly around the circumference of the head, the sound will be out of balance. When one side or section of the djembe head is tighter than another, different pitches are created, leaving the sound flat or muted. By having even tension the skin will vibrate at the same level all the way around the drum, creating a more full, resonant sound. Physical Indicators The vertical ropes on a loose djembe can be moved with the fingers, whereas on a taught djembe the ropes will feel stiff and immobile. The taller the drum the more movement will be found in the vertical ropes, but even so the movement should be limited to 1/8" to 1/4" maximum. If the top rings of the djembe (where the loops attach and which holds the skin in place) are not even, being dropped lower on one side or the other, this is an indication that the tension may not be even on the head. In this case the tension should be undone, and reapplied as evenly as possible, so the rings maintain a straight line horizontally. |
|
WHICH TOOLS WILL I NEED TO TUNE MY DJEMBE? |
|
|
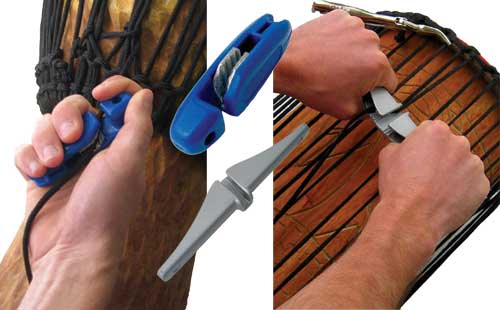
At minimum you'll need a pair of hands and extra tuning rope.. The tuning rope will ideally be the same size and strength as the existing vertical rope on your djembe, with 3'-10' depending on how loose the head is. In most cases the tuning rope is just an extension of the verticals that has in some way been wrapped around the drum for storage. If your drum has no existing tuning rope, you can purchase some and attach, as shown below. In addition, you'll probably find it helpful to have a pair of gloves, a screwdriver, and/or a rope puller. The gloves are to protect your hands from abrasion when pulling hard on the ropes, but they're not necessary. The screwdriver is for lifting pairs of verticals in order to allow the tuning rope to pass under them more easily. The rope puller is for gripping the rope, which saves your hands from pain and gives you more leverage for applying tension. There are various types of rope pullers available, including plastic rigging tools, stronger aluminum cleats, and double handle pullers for even more leverage. |
|
PREPARING TO TUNE THE DJEMBE
Before the djembe can be tuned, the flow of tension must be understood, as well as how to select which vertical ropes will be the "tuning pairs".
|
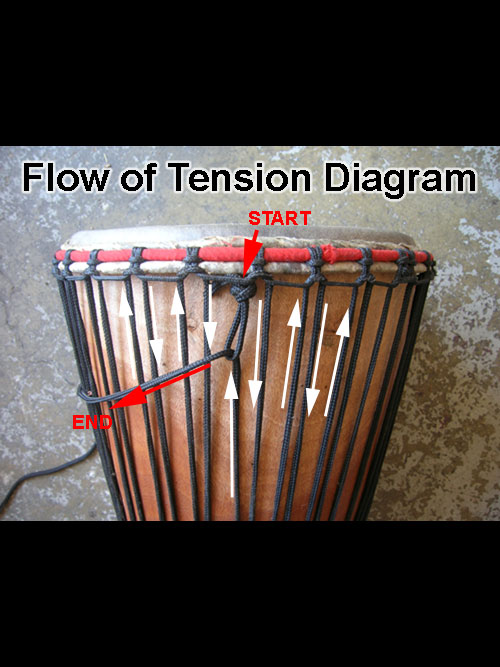
Flow of Tension The picture below indicates where the tension starts, how it feeds around the drum, and where it ends. In the case of the diagram, the tension flows to the right, counter-clockwise. Many drums will flow to the left instead, clock-wise. Either way, the diagram will still be helpful. The vertical tension tension starts at the knotted loop, which may be near the top rings, bottom rings, or in the middle. From there the tension flows up one vertical, through the loops, and down the next vertical.After continuing all the way around the bowl, the tail will be tied off, either by feeding through the knotted loop, or some other way. |
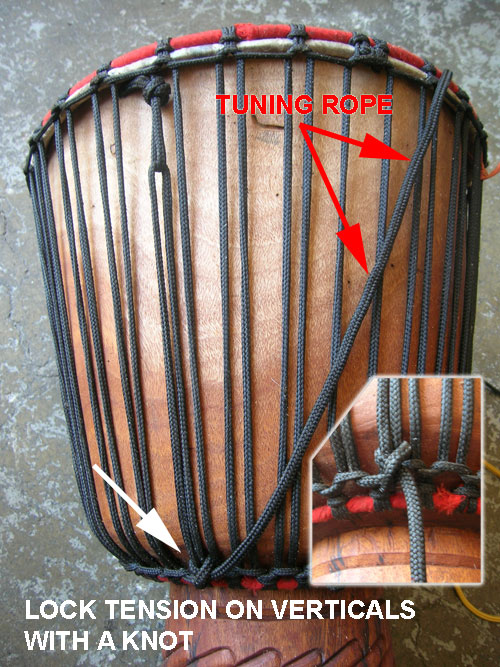
Phase One: Pull the Verticals Tight The first phase of tuning a djembe is to pull the vertical ropes as tight as possible; each downward-flowing vertical should be pulled - by hand, using a rope puller or dowel, or with a rope pulling machine - with the slack transferred around the drum, making the tail longer. The tension should then be tied off so the verticals don't loosen after you stop pulling on them. The excess vertical rope now becomes your tuning rope for pulling diamonds. Note: Don't proceed with weave tuning until the vertical ropes have all slack taken out. The tighter the vertical ropes are to start with the more effective the weave tuning will be. |
|
 |
 |
|
|
Selecting Vertical Tuning Pairs The best way to select which verticals will be used as tuning pairs is to determine where the greatest distance is between pairs near the bottom ring. These distances are determined by how many bottom loops there are, and the size of those loops. The tuning pairs will be those with the greatest distance between them. On most djembes the choice will be obvious, but if the distance appears to be more or less the same - as in the picture below - then choose for pairs those that don't share a loop. The white arrows indicate where the verticals extend upward out of different loops. The verticals either side of the arrow should be chosen as the tuning pairs. The picture below shows which verticals will be the tuning pairs, and gives an example of how to attach a separate tuning rope. Each pair consists of vertical #1 and vertical #2, which is highlighted in 3 pairs, red, blue, and green. This pattern will continue around the drum, with no verticals being skipped. If your drum has an odd number of verticals then the loops were not done correctly, and you can double up on one pair if needed. If your djembe doesn't have extra vertical rope that can be used as the tuning rope, you can attach an extra length of rope for tuning. It is a myth that the tuning rope has to be connected to the vertical rope in order to work. The only reason this would be true is if the vertical rope is not tied off with a knot, keeping the tension locked in. The length of tuning rope you'll need will depend on the size of your drum and how many rows of diamonds you'll have to have to achieve proper tension. In general it is a good idea to have enough tuning rope to go around at least twice. For a standard size djembe you'll want about 3' to 4' per row. To attach the rope, simply create a knot in one end and slip that underneath the vertical before the pair you want to use as the first tuning pair. Of course there are other ways to attach the vertical rope; this is just one example of a simple, effective, clean way to do it. |
||
 |
 |
|
PHASE TWO: THE FIRST ROW WEAVE
If your djembe still needs more tension after the verticals are pulled as tight as possible you'll need to increase tension by twisting pairs of verticals. As described above this process is known by many names, which all refer to the same weave tuning process. There are many different weave patterns, each of which is used to achieve different objectives. Again, for simplicity, we only teach the two most common - the S-Weave and the Under-Weave.
Either version can be used at any time, but we'd recommend using one or the other, depending on the construction and tension of the drum. The S-Weave is self-locking so it is better suited for use when the vertical ropes are not touching the wood or when the verticals are spaced far apart.. Some prefer the finished look of the S-Weave over other patterns. The Under-Weave is an easier pattern to weave, and will sometimes allow the knot to be positioned closer to the bottom rings than other versions. This weave tends to come undone unless it is held in place by contact with the wood or by tucking the extra tuning rope under the next pair of verticals. For most djembes we'd recommend using the Under-Weave for the first row of diamonds, and the S-Weave for additional rows if needed.
First Row - S-Weave (A)
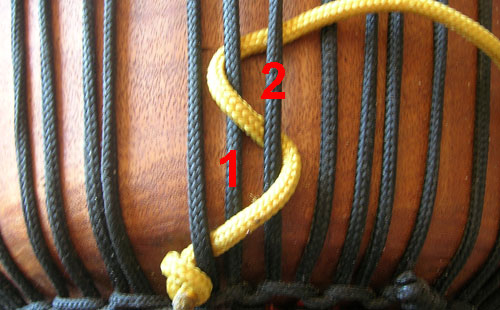
The S-Weave consists of five steps, each of which is explained below with the help of pictures. We've used a separate yellow tuning rope only to better illustrate the weave pattern, and to give an example of how to tie on an extra tuning rope if needed. After determining which verticals are best to use as your tuning pairs, and making mental note of which is #1 and #2, follow this pattern: over; between; under; slide down; twist.
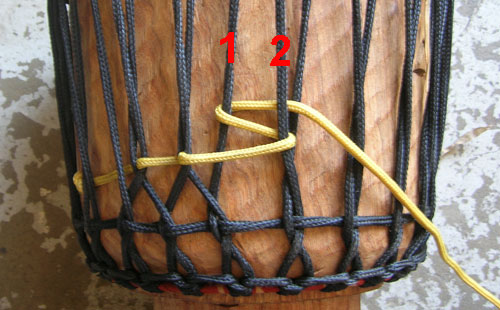
| Step 1: Over - The tuning rope passes over #1 and #2. Position the tuning rope as low as possible on the tuning pair, close to the loops on the bottom ring. This will help maintain a straight line as the horizontal row progresses around the drum, which keeps the tension levels even. | Step 2: Between - The tuning rope passes around and underneath #2, and feeds up between #1 and #2. | |
 |
 |
|
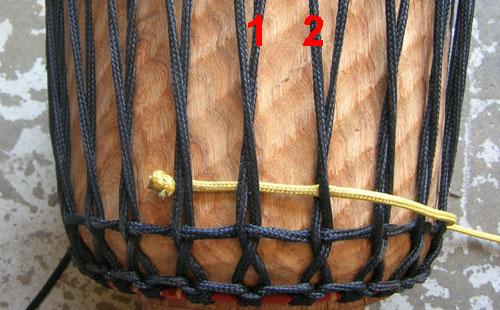
| Step 3: Under - The tuning rope passes around and underneath #1 and #2, and feeds up to the side of #2. Be sure not to pass the tuning rope underneath additional verticals (potentially #1 and #2 of the next pair). After completing this step you can see the "S" shape created by the tuning rope as it weaves through the vertical tuning pair. | Step 4: Slide Down - Pull the tuning rope downward, removing the slack and causing it to pass underneath itself, inverting the "S" shape. If #2 is too tight against the wood to allow the tuning rope to pass underneath it, use a screwdriver or other tool to gently lift #2 so that this step can be completed. | |
 |
 |
|
| Step 5: Twist - Continue pulling the vertical rope downward until the ropes twist. The tighter the verticals the more force will be required to complete this step. If you don't want to wrap the tuning rope around your hand to get a solid grip, you may consider using a rope pulling tool, or wrapping the tuning rope around a hammer handle or thick wood dowel. Make sure you pull as much with the arms and legs as possible, and avoid pulling from the lower back alone. Continue to monitor the distance between the completed weave knot and the loops; keep that distance as narrow as possible (indicated by white double arrow). | ||
 |
First Row - Under-Weave (B)
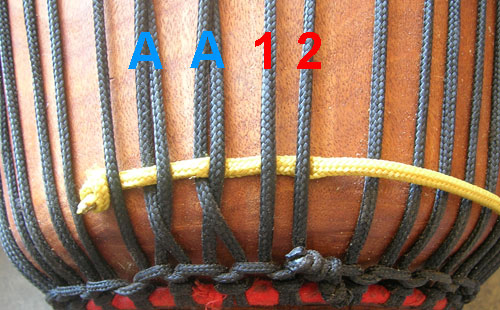
The Under-Weave consists of three steps, each of which is explained below with the help of pictures. As with the S-Weave, we've used a separate yellow tuning rope only to better illustrate the weave pattern, and to give an example of how to tie on an extra tuning rope if needed. After determining which verticals are best to use as your tuning pairs, and making mental note of which is #1 and #2, follow this pattern: under; between; twist. Note that the pictures below show two completed knots using the S-Weave pattern, marked with a blue "A". The verticals to illustrate the Under-Weave are marked with a red numbers.
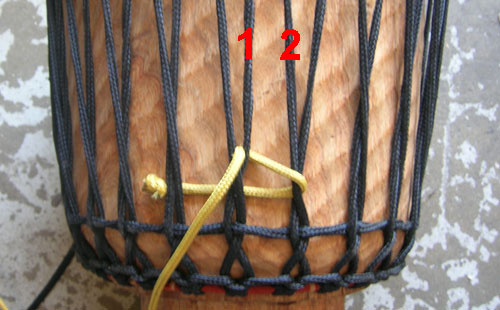
| Step 1: Under - The tuning rope passes under #1 and #2. Make sure that the line created is straight, and that it is positioned as close to the bottom loops as possible. | Step 2: Between - The tuning rope passes over #2 and under #1, or between the pair. | |
 |
 |
|
| Step 3: Twist - Pull the tuning rope downward and outward until #1 and #2 twist, creating a knot, or "diamond". This knot may have a tendency to undo itself because of the pressure on the verticals, so it may be necessary to pass the tuning rope underneath the next pair in order to keep it twisted, as indicated with the white arrow. | ||
 |
PHASE THREE: THE SECOND ROW WEAVE
|
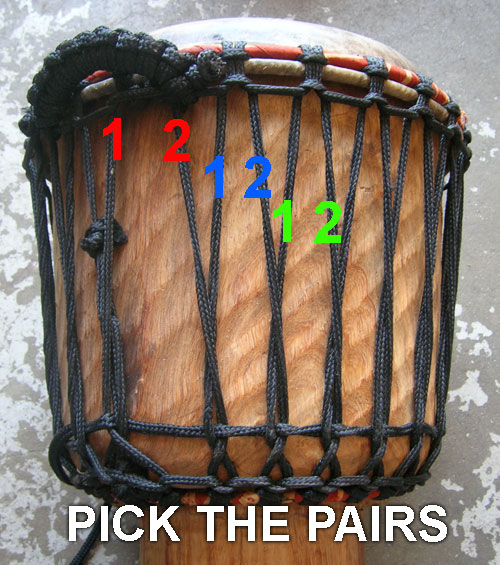
Pick the Pairs - The selection of tuning pairs for the second row will depend on which vertical pairs were twisted on the first row. The method for selecting is easy: First, you won't be retwisting the same pair you did on the previous row. Second, Select the verticals that are closest to each other near the top loops. Depending on which verticals were the tuning pairs on the first row, you may find your drum looks like the one on the right, with plenty of space between the verticals. Otherwise, the verticals may already be very close together, which is no problem; just pick the two that are closest together using the top loops as a reference point. The color-coded number of tuning pairs in the photo should help solve the mystery. Decide Which Weave To Use - As explained above, the S-Weave and the Under-Weave each have different strengths. We recommend the Under-Weave be used for most djembes for the first row of diamonds, and the S-Weave be used for the second and subsequent rows. The reason for this is that the S-Weave is better at holding its twist than the Under-Weave; the ropes on most djembes tend to NOT be touching the wood by the time you get to the second or third row, which allows the Under-Weave to untwist itself easily. Decide in Which Direction to Weave - Many djembe tuners will recommend that the direction the weave travels around the drum should alternate from row to row. As long as the distance between verticals is similar, the tension on each vertical before weaving was similar, and the rings are positioned evenly horizontally, it shouldn't matter. However, if for some reason you find that the drum is higher on one side than the other, or that by continuing in one or the other direction would cause excess tension to one side, then make the rational choice to start the second row in the direction that would most likely keep tension - or cause tension to become - even distributed around the drum head. Decide How Many Knots You'll Need - As the number of rows of diamonds increases, so does the amount of tension added per knot twisted. Bear in mind that you many not need to complete the entire second row, since the tension will begin to increase much more quickly on the second row than it did on the first row. If this applies to your djembe, rather than only complete a portion of the second row, which would leave one section tighter than another, do your best to guage how many knots you will need to achieve the desire tension, and apply that number of knots evenly around the drum. Yes, it is okay to skip tuning pairs, and only put in a knot every other, or every third, pair, as the case may be. |
 |
|
Second Row - S-Weave (A) |
||
| Step 1: Over - The tuning rope passes over #1 and #2. Position the tuning rope as low as possible on the tuning pair, close to the loops on the bottom ring. This will help maintain a straight line as the horizontal row progresses around the drum, which keeps the tension levels even. | Step 2: Between - The tuning rope passes around and underneath #2, and feeds up between #1 and #2. | |
 |
 |
|
| Step 3: Under - The tuning rope passes around and underneath #1 and #2, and feeds up to the side of #2. Be sure not to pass the tuning rope underneath additional verticals (potentially #1 and #2 of the next pair). After completing this step you can see the "S" shape created by the tuning rope as it weaves through the vertical tuning pair. | Step 4: Slide Down - Pull the tuning rope downward, removing the slack and causing it to pass underneath itself, inverting the "S" shape. If #2 is too tight against the wood to allow the tuning rope to pass underneath it, use a screwdriver or other tool to gently lift #2 so that this step can be completed. | |
 |
 |
|
| Step 5: Twist - Continue pulling the vertical rope downward until the ropes twist. The tighter the verticals the more force will be required to complete this step. If you don't want to wrap the tuning rope around your hand to get a solid grip, you may consider using a rope pulling tool, or wrapping the tuning rope around a hammer handle or thick wood dowel. | ||
 |
||
Second Row - Under-Weave (B) |
||
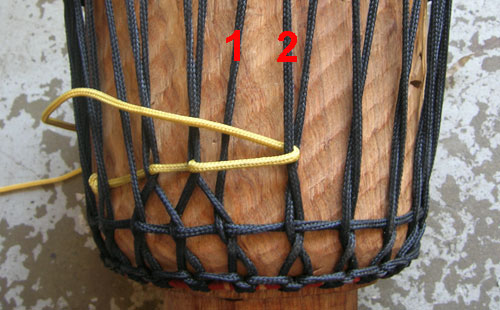
| Step 1: Under - The tuning rope passes under #1 and #2. Make sure that the line created is straight, and that it is positioned as close to the bottom loops as possible. The photo below shows how to add a separate tuning rope as well, which passes under two pairs of verticals before starting the weave for the first knot. | Step 2: Between - The tuning rope passes over #2 and under #1, or between the pair. Be sure not to pass under verticals that are not part of the immediate tuning pair. | |
 |
 |
|
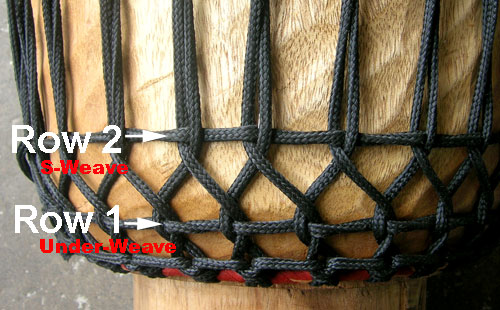
| Step 3: Twist - Pull the tuning rope downward and outward until #1 and #2 twist, creating a knot, or "diamond". This knot may have a tendency to undo itself because of the pressure on the verticals, so it may be necessary to pass the tuning rope underneath the next pair in order to keep it twisted.. | Step 4: Admire and Play - The picture below shows an example of what the completed rows look like. Hopefully the rows are straight and the diamonds are clear, and your drum sounds better as a result. | |
 |
 |
|
FINE TUNING TIPS
Even Tension a Must - In order to achieve the best sound your drum is capable of producing (based on skin quality and thickness, wood type, shell thickness, body shape, etc...), the tension must be applied evenly around the head. When there is an imbalance of tension sound quality suffers. Throughout the tuning process you should be keenly aware of keeping the tension as even as possible. You can monitor the tension by listening to the pitch as it being adjusted, by looking at the level of the top rings and the taughness of the skin, and by touching the the ropes and skin to guage relative tension.
The best way to tell of minor differences in pitch is to lightly tap the rim of the drum with your index finger (like a rim-shot) and listen for the actual pitch. Do this around the drum and find areas that are lower than others. It may be helpful to divide the head into quadrants, then tap the center of each quadrant. Opposite quadrants have a tendency to match in pitch.
Tuning Can't Make Up for Poor Quality Craftsmanship - Some drums will not be capable of maintaing a good tune, for one of the following reasons: the rope is too stretchy, causing uneven loss of tension over time; the skin is slipping between the top two (or three) rings; the rings are incorrectly sized, thus allowing slipping of the skin or too much flexibility; the bearing edge is not even; the shape of the bowl highly irregular. In any case, you can help improve sound with a good tuning, but you may not be able to overcome these weaknesses simply by adjusting tension. If you feel your djembe isn't capable to sounding as good as you would like it too, consider upgrading to a higher quality instrument.
Process vs. Event - Because wood and skin are materials that take up and release water, and because rope, metal, wood, and skin are malleable materials that can stretch and bend, the sound of your djembe is likely to change with variations in temperature and relative humidity, and as a result of being played or not played. Tuning a djembe is usually not a one time event, but is a process that requires reevaluation from time to time. Djembes with new skin or rope will certainly need more tuning than those that have had higher tension for longer. Having said this, if the drum is kept in an even climate and the stretch has been taken out of the skin and rope, you can and will reach a point where the drum is "maxed out" - tightened as much as it can be tightened without breaking. The djembe is then more or less in a stable state, and won't require additional weave tuning.
Know When to Skip Knots - If your djembe already has a fair level of tension, but you want to bring it up just a little bit - or if the tension is a little out of balance and you need to bring up a certain section - then feel free to just weave knots in specific places where tension is required. The tuning rope between the knots can either be fed on the outside of the verticals, or fed underneath the verticals (recommended).
Make Use of the Mallet - If the adjustment needed to achieve even tension is too small to make use of additional diamonds, using a mallet to tap the crown/loop ring will help. Be sure to use a rubber or leather mallet only (no metal hammers allowed!), make contact only with the ring, not the skin or the rim of the drum, and don't smack the ring with all your force. Start with light taps on the ring, and increase as needed. Test the pitch after each succession of hits with the mallet. You can use this method to increase ttension a little at a time, and to decrease tension by tapping the bottom of the rings, toward the top of the drum. Most professional djembe drummers carry a small rubber mallet with them in order to make fine adjustments on an ongoing basis.
Avoid Twisted Tuning Rope - One problem many drummer have when tuning their djembe is the constant twisting of the tuning rope as it is pulled through the verticals. If you find yourself trying to untwist the tuning rope, try this tip: Feed the rope through starting at the closest point, rather than tip-first. Take a look at the pictures below to see examples of how this is done. You'll notice that as you pull the rope through, the twists in the rope unwind themselves, leaving you with a clean, straight weave!
 |
 |